This page is contains information intended to help you and your student to get started with our Educational side of the SKrafty website. Here is a list of topics that are covered:
Requirements for Utilizing Subscriptions
How to Purchase Subscriptions
How to Register for Live Classes
How to Create a Parent Account
How to Access Courses
How to Utilize Bookmarks
How to Access the Handy Homeschool Planner
How to Use the Student Portal
How to Complete Courses
How to Submit Assignments
How to Participate in Clubs
How to Cancel a Subscription
Requirements for Utilizing Subscriptions
- SKrafty courses, both live and self-paced, can be participated in using any browser. Live class participants will have the best experienced when accessed via Chrome or Firefox browsers.
- Minecraft assignment builds are completely optional and can be created on our server or in single-player mode. Builds may also be done with alternative materials like building bricks or even in drawn art.
- Our Minecraft assignment build server is only available for the Java (computer) and Bedrock (aka Pocket Edition/PE) versions of the game. Our free Multiplayer games server is available on the Java edition (Windows/Mac) of Minecraft and also houses a robust creative area for our SKool participants. Our Bedrock version server only houses a classroom build server and is only available to Subscribers. The Bedrock edition of Minecraft is available on tablets, phones, Surfacebooks, Galaxybooks, Chromebooks, and other similar non-traditional OS computers (these non-traditional computers will not run the Java version of the game). The Windows 10 app (usually purchased via the Microsoft Store) for Minecraft is Bedrock edition and will not give you access to our PC games server, only the Bedrock version server. We do not have a server accessible via Bedrock versions of Minecraft on consoles (Xbox, PlayStation, Switch).
How to Purchase Subscriptions
- Each Subscription requires its own account. Parents will create their own separate account as well. *see How to Create a Parent Account
- At our store page, select which Subscription option works best for your family. *Please do not add course/club registration to a Subscription order.
- Select monthly renewal or yearly renewal. Each subscription renews automatically based on the option selected. Click “Sign Up Now” to add your Subscription to Cart
- On the Cart page, you will find a “Coupon Code” box. If you have a discount code, you will enter that code here. Confirm the total and click Proceed to Checkout.
- Here you will create the account your student will access their Subscription with as well as pay for your order. Please provide your student’s information and Minecraft PC and PE playernames in their respective boxes (if you do not provide the username for your player, our system will be unable to automatically whitelist your player to our Minecraft server.)
- Subscriptions can be purchased using PayPal or our Credit Card processor. All Subscriptions auto-renew, but may be cancelled any time via your account.
- If you have purchased the Subscription plus Rank Up and wish to also register their sibling children, email support@skrafty.com for a 50% off discount code for those children.
- When purchasing a subscription for your subsequent students, you must be logged out of any current SKrafty accounts. Do not log in as an existing user. Each subscriber must have their own account with a different email address (email address may not be reused across multiple SKrafty accounts).
How to Register for Live Classes
- Subscribers
- Log into the account of the student who will be participating in the Live Course. (You will not see the Live Course discount if you are not logged into the subscribers account).
- On our store page, select which course(s) you would like to register that student for and add them to your Cart.
- In your cart, confirm your purchase is correct, enter a coupon code (if available), and click Proceed to Checkout.
- If you are not logged into your Subscription account, please click “Returning Customer?” and log in as the student who will be taking the course. Confirm your account information and enter your purchase information.
- Repeat this process for subsequent students.
- Non-Subscribers
- At our store page, select which course(s) you would like to register that student for and add them to your Cart
- In your cart, confirm your purchase is correct, enter a coupon code (if available), and click Proceed to Checkout.
- Here you will create the account your student will access their course(s) with as well as pay for your order. Please provide your student’s information and Minecraft PC and PE playernames in their respective boxes (if you do not provide the username for your player, our system will be unable to automatically whitelist your player to our Minecraft server.)
- Repeat this process for subsequent students.
How to Create a Parent Account
A Parent account will give you the ability to view your students chat logs for the last 24 hours, view students course progression and quiz results, as well as access the Chore Rewards and Parental code programs in one centralized location. Please be sure you are logged out of your student account(s) as you will need to create a new account (one for yourself). The Parent Dashboard is $20, but If you have purchased a Subscription for your student, email support@skrafty.com for the discount code for your free account.
- Head to https://whenyouriseup.com/product/parent-dashboard-registration/ and click Add to Cart.
- In your cart, confirm your purchase is correct, enter a coupon code (if available), and click Proceed to Checkout.
- Here you will create the account your student will access their course(s) with as well as pay for your order (if you are not utilizing a discount code). This account is for the parent, so you will use your information for this account. If you do not have a Minecraft username, you can skip those fields.
- Once you’ve completed your purchase, you will now have a button at the top of your page that says “Parent”. This is where you will access your Parent Dashboard:

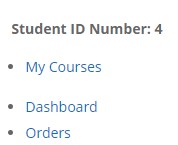
- In order to add your students to this account, you will need to log into each student account and find their Student ID Number. Once logged into the student account, got to the My Info button and click Account Information. You will find the number on the top of the column just to the left of the page. You can also find this ID Number by clicking “Student Portal” and looking near the top of that page
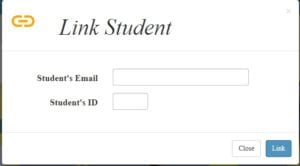
- After you’ve gathered your Student ID Number(s), you will go back to your Parent account and go to the Parent Portal Controls section. Click the button that says “Link Students”. You will enter the Student ID Number and the email address for your student’s account here. You will repeat this step for each student.
- Once a student is linked, you will be able to select their name in the drop down in the upper left corner. You will be able to switch between multiple students with this button to view their 24 hour chat log (only available for Minecraft Java version users), course progression, quiz results, planner schedules, and report cards.
- The daily codes for our *Parental Control program and our *Chore Rewards program are found in the buttons in the Parental Portal section as well. These can be registered for by clicking the appropriate buttons.
-
- *These programs are only available for students utilizing the Java version of Minecraft. A valid Java Minecraft username must already be added to the student’s SKrafty account in order to successfully complete registration to these programs.
-
How to Access Courses
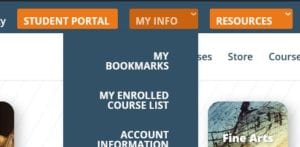
Courses are accessed through our website, whenyouriseup.com (skrafty.com). You can quickly access our entire course list at our Course Library or you can go to the “My Info” button and select “My Enrolled Course List”. You must be logged into the student’s subscription account in order to view the course lessons.

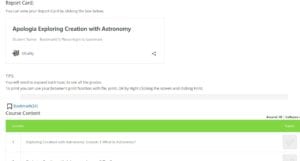
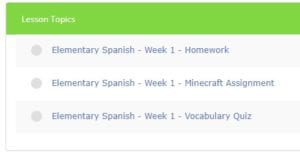
- Report Cards for each course will be found in the Course description above the list of lessons. You will click the link for each lesson to be taken to the topics for that lesson each week.
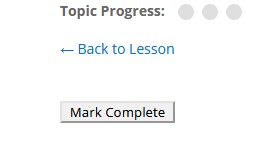
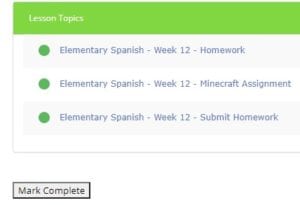
- Your student will be required to complete each topic under the lessons in the order presented. They must click each “Mark Complete” button that is presented in order to move to the next lesson. There is a button for each topic and each individual lesson.
- Live courses take place in either our Zoom classroom or our Live Link classroom. Your lesson pages for these courses contain detailed directions to get you to the proper program. You can participate in live class sessions on PC, laptops, or devices like tablets and phones. Recordings for each live session will be available on the lesson page shortly after the live session ends.
How to Utilize Bookmarks
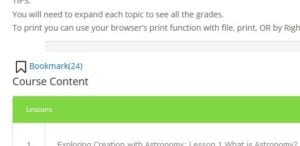
As part of our Subscription programs, your student will be enrolled in all available courses fo your subscription option. This means all the courses will show in their Course Library. Because of this, the Bookmark feature will help you more easily access only the courses your student is actively taking.
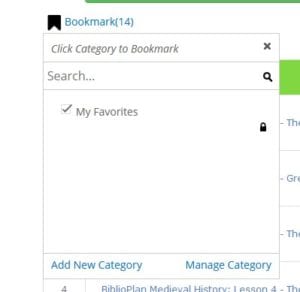
- To add a course to your bookmarks list, open the course and scroll to the “Bookmark” link between the course description and the list of lessons. Click that link and it will add the course to your Bookmark list. You can organize your Bookmarks however you’d like. To delete a bookmark, simply click the link once more and uncheck the checkbox.
- You can organize your bookmarks however you’d like using the “Add New Category” and “Manage Category” links.
- Once your bookmarks have been established, you will be able to access them quickly by opening the Student Portal or clicking the “My Bookmarks” link in the “My Info” button.
How to Access the Handy Homeschool Planner
This video is an overview of the features and set up for our Handy Homeschool Planner. A full FAQ for our Handy Homeschool Planner is coming soon. If you are utilizing our Handy Homeschool Planner and are on Facebook, join us on our Handy Homeschool Planner group for further help. https://www.facebook.com/groups/201411614097044
How to Use the Student Portal
The Student Portal is a fun dashboard for the students to access their bookmarked courses, see their earned badges, and more. While logged in as the student, simply click the “Student Portal” button and they will be presented with their dashboard.
- The top of the page will allow your student to create and personalize their profile. Students can select a profile image that will show to other SKrafty users. Participating in courses will earn students coins. Coin balances are found on the portal in this section as well.

- Coins may be used to upgrade a students level. There will be more fun coming to this feature in the future, so keep your eyes out for changes.

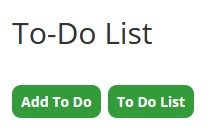
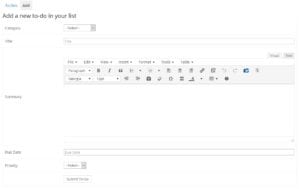
- Another feature of the Student Portal is the To Do list. This allows you or your student to create lists of things to be done by the student and deadline that will appear in this section. This is helpful to remind your student of assignments due, chores to be done, and more.
- Bookmarked courses are found after the To Do lists. Each course and it’s lessons are laid out here for the easiest access to each course.

How to Complete Courses
SKrafty offers both self-paced and Live courses. Self-paced course may be taken at any time, on any schedule you prefer. Live courses are taken at the pacing and schedule provided. Courses begin with Lesson One and must be taken in the order presented. As your student completes their course, they will earn badges and coins that they can view in their student portal. This is the process for completing a course:
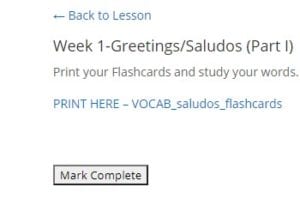
- Click on the first lesson to be taken to that lessons presentation. If applicable, you will find either a recorded video or link to the Live session that will be taking place at the given scheduled time. *Should you find that a video link is broken, please contact support@skrafty.com to let us know.*

- Once the lesson video is completed (if applicable), click on the first topic listed beneath the lesson video to complete the assignment provided.
- As you move through the topics, you will find a button that says “Mark Complete” at the bottom of each page. You must click this button to move through the lesson. If you do not, you will receive an error asking you to complete the previous lesson in order to continue. *Note – Minecraft Assignments are completely optional. If you wish to skip these, you may simply click the Mark Complete button and move on. You must still click the button.
- Once you’ve completed all topics in a lesson, you will return to the lesson page and find a final Mark Complete button for that lesson. Click this button to access the next lesson in your course. You will notice each topic now has a green light beside it.
- Once you’ve completed all lessons and their associated topics, you will be presented with a full “Course Progress” bar and a button that will take you to your course completion certificate.
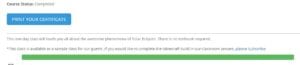
- If you have reached the end of your course and are not presented with the Certificate, please review all previous lessons to ensure each Mark Complete button was clicked on each topic and lesson. Even if you are not participating in the Minecraft Assignments, you must click the Mark Complete button.
- You will also receive nuggets for use in our Java Minecraft server. These are automatically awarded to the player upon completion of a course along with the “Diamond Armor” badge.
How to Submit Assignments
Some of our Live courses will require the student to submit assignments via our website. Our IEW courses will require the use of Google Docs for assignment submission and the instructions for that are found in the Getting Started section of those courses. Here is how to do submit assignments for non-IEW courses.
- The homework assigned must be completed and assembled as instructed by the teacher. This can be done by scanning hand written papers/worksheets into one document or typing homework on a digital document directly.
- Take a picture or scan your completed assignments and combine all the images into one document. Upload this assignment using the box below. Click Browse, find your file, and insert it. Click Upload and then your done. If you are not familiar with the process of combining images on a document, you can follow these steps to do so:
- Create a new document using the word processor of your choice.
- Enter your assignment into the document by typing and adding pictures. Place pictures in the document by clicking the “Insert” option then “Image” and selecting the photo/scan you wish to add. Images can be resized to fit the page.
- Save your document in a place where you will easily find it to upload to your Submit Homework page. *If you are using Google Docs, go to the top left and click File. Go to the Download option and select PDF. Save this PDF to a folder where you can find it.
- Take a picture or scan your completed assignments and combine all the images into one document. Upload this assignment using the box below. Click Browse, find your file, and insert it. Click Upload and then your done. If you are not familiar with the process of combining images on a document, you can follow these steps to do so:
- Students will have a topic in the lesson called “Submit Homework.” In this topic, you will find a box to add your document for submission:
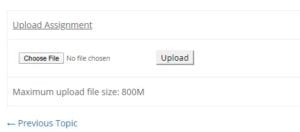
- You can not submit more than one file in the Upload box and you will not be able to make any changes to your submissions if you make a mistake. Please be sure you have selected the proper file before submitting your work.
How to Participate in Clubs
- SKrafty Clubs meet once a month in our live meeting rooms to discuss the topics and concepts associated with that club. Just go to the course page for the club and use the link provided to access the live session. Our current club offerings are:
- Bird Club – Meets every 1st Friday at 1:00 PM CST
- Survival Club – Meets every 2nd Friday at 4:00 PM CST
- Pixel Art Club – Meets every 4th Wednesday at 2:00 PM CST
- Book Club – Meets every 4th Friday at 4:00 PM CST
- SKrafty Subscription plus Rank Up participants have free access to all clubs. Clubs are $2 bi-monthly for all other users.
- Once registered (either through Subscription or individual registration), the club(s) will show up in your available course list. You can bookmark it for future reference.
How to Cancel a Subscription
You can cancel your subscription any time via the student’s account that is utilizing the subscription.
- Log into the account with a subscription and head to this link: https://whenyouriseup.com/my-account/subscriptions/
- On the left hand of the page, click the link for “Subscriptions”. Your subscription can be managed there.
- Select which subscription you wish to end and click the Cancel button.
- Subscriptions will remain active until the next scheduled payment date.
- Please be sure to cancel at least 48 hours before your next payment date to avoid future charges.
- If you have more than one Subscription (for instance you have two students), you must log into each account and cancel it.
- Our Refund policy can be found here: https://whenyouriseup.com/skrafty-refund-policy/