HHP
Introduction
HHP
How To Create A Custom Course
HHP
How To Link Your Student
HHP
How To Assign A Custom Course To A Student
HHP
Adding A SKrafty Course
This page contains information intended to help you and your student to get started with our Handy Homeschool Planner. Here is a list of topics that are covered:
How to Sign Up for HHP
Get Familiar with Planner Dashboard
How to Add Students
How to Add Courses
How to Add Assignments and Events
How to View Schedules
How to Edit Schedules
How to Personalize the Planner
How to View Report Cards
How to Use Student Chat
How to Sign Up for HHP (Handy Homeschool Planner)
The Handy Homeschool Planner is free for all SKrafty Subscription participants. If you are not a Subscriber, but would like to utilize the Handy Homeschool Planner, you can register for an account here: https://whenyouriseup.com/product/handy-homeschool-planner/
If you have a student who is already a Subscriber, you will need to set up the Parent Account for yourself in order to utilize this program. You will need to email support@skrafty.com to receive a free code to register for that. You can find instructions on how to set up this account here. Once you’ve registered or created a Parent Account, you can begin adding students to the HHP.
Get Familiar with Planner Dashboard
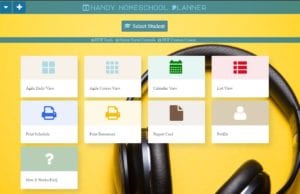
Your Planner dashboard is now a combination of our Parent Dashboard and our Handy Homeschool Planner. We’ve merged these programs to make things easier for you as a parent to find what you are looking for. If you do not have a Subscription student, you can purchase a subscription for our Handy Homeschool Planner here for $8.99 per month: https://whenyouriseup.com/product/handy-homeschool-planner/ The Handy Homeschool Planner will allow you to schedule your student’s school work, along with chores and other tasks in one main space. You can also leave messages for your student and actively interact with them using our Chat feature on the site. You can return to your Dashboard page at anytime by clicking the gauge icon in the upper left corner:
![]()
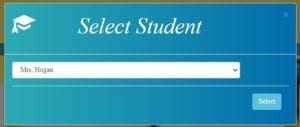
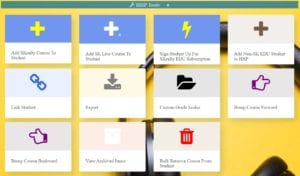
All student information is viewable by clicking the “Select Student” button. There are three sections on your dashboard page. The first includes various views of schedules and calendars for the selected student. The second section is tools for the HHP which will allow you to add courses to your student’s schedule, create custom grade scales, and more. In the third section you will find your Parent Portal, which will allow you to view Quizzes taken by your student, their last 24 hours of chat log*, and Chore and Parent Control codes for each day*. (*these features are only available for students utilizing the Java version of Minecraft). There are also drop down menus to the left and right of the dashboard page to serve as quick access to the features on your main dashboard page.
How to Add Students
There are two ways to add students to your HHP:
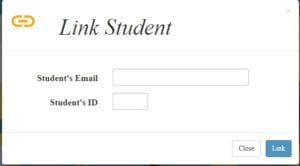
- If your students are SKrafty subscribers, you will use the “Link Student” button found under the Parent Portal Controls or the HHP Tools section. You will need the email address on your student account as well as their Student ID number.
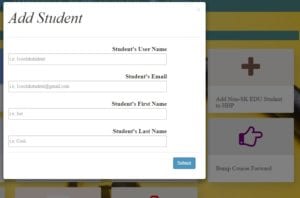
- If your student is not a SKrafty subscriber, you can add them using the “Add Non-SK EDU Student to HHP” button found in the HHP tools section. You will provide a username of your choosing for said student.
- You will now be able to select your student in the drop down menu to review their schedules, calendar, chat logs, quizzes, and assign them new tasks.

How to Add Courses
Adding courses is done to automatically schedule a SKrafty course to your student’s calendar. This is done on the parent’s dashboard.
- Add a self-paced course:
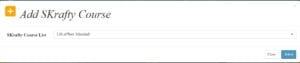
- Under HHP Tools, click “Add SKrafty Course To Student”
- select the course you wish to add from the drop down menu and click “Select”
- You will now be presented with a form to tailor the schedule to your student. On this form, you will select the student who will take the course, the date and day of week to start the course, course subject, and a color you’d like to assign to that course
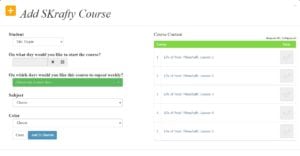
- Your course is now scheduled to your student’s planner.
- Under HHP Tools, click “Add SKrafty Course To Student”
- Add a Live Course:
- Click “Add SKrafty Live Course To Student”
- Select the student and the course from the drop down menus. Click “Add to Student”
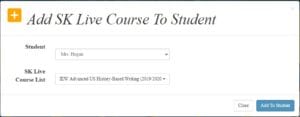
- Your course is now scheduled to your student’s planner.
Creating Custom Courses allows you to add a course that may not be in the SKrafty library or is but you wish to schedule it differently.
- Scroll to the “HHP Custom Course Control” section on your dashboard. Click “Create Custom Course”.
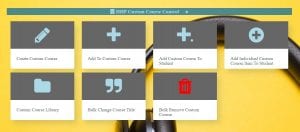
- Complete the form presented in full to create your course.
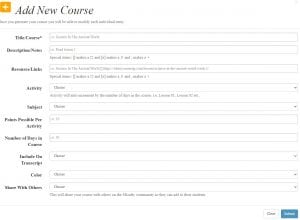
- Once your course is created, use the “Add Custom Course to Student” button to assign your course to your student(s). You can make edits to your custom courses by clicking the “Add To Custom Course” button.
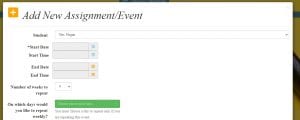
How to Add Assignments and Events
Assignments and Events for courses and tasks that are not part of a SKrafty course. This can be used for adding chores, non-SKrafty homework, or tasks like reading time.
- Click the + sign in the upper left corner of your page

- This will present you with a form to assign and schedule your assignment/event. Complete the form then click “Save”
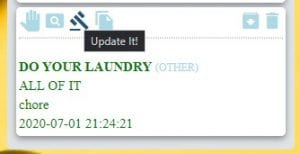
- You will now be able to view the event in the student’s calendar. You can edit this event by clicking the Update It icon.
- You can also add assignments or events by clicking an empty space in the Calendar view.
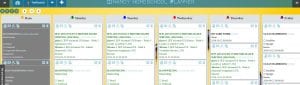
How to View Schedules
Student’s schedules can be viewed in three different views.
- Agile Daily View – this view allows the student to see their entire workload one week at a time.
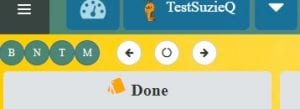
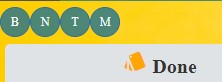
- You can quickly switch between students and dates by using the buttons above the “Done” module. The letters will switch between each student, while the arrows will move forward and back in the timeline. The center circle will bring you back to the current week.
- You can quickly switch between students and dates by using the buttons above the “Done” module. The letters will switch between each student, while the arrows will move forward and back in the timeline. The center circle will bring you back to the current week.
- Agile Course View – this view allows the student to see each course individually to look ahead at coming assignments and tasks. Just click “Add Course” to easily add a course to your student’s schedule.
- This view also contains a quick student switcher, but no date changer:
- This view also contains a quick student switcher, but no date changer:
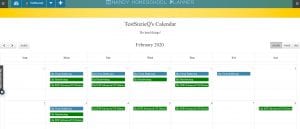
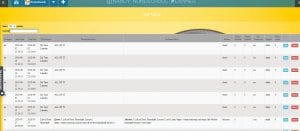
- Calendar View – this view shows a monthly calendar of each event and time each event is due.
- List View – this view will show all of the tasks for your student in one list in order of task/course.
How to Edit Schedules
Schedules and Events can be edited from many different places in the program.
Agile Daily View:
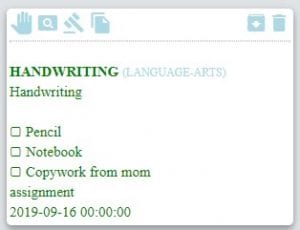
- Each item card contains the instructions for each item. Across the top of the card are options for editing and reusing the item.
- The hand icon allows you to pick up the card and physically move it to a different place in the schedule to assign it for a different day.
- The magnifying glass icon will allow you to view the item in detail
- The gavel icon will bring up the edit screen for the item. This option allows you to make changes to the item, like the title, date due, etc.
- The paper icon will allow you to duplicate an item identically to reuse the information so you don’t have to type all the information in more than once.
- The down arrow icon will allow you to archive the item for removing now, but accessing again at a later date.
- The trash can icon will completely delete an item. This action cannot be undone.
Agile Course View:
- Item cards are the same as the Agile Daily View, but shows all events for the course and not just the current week. Here, you can remove any assignments you’d prefer your student not complete, or add events as needed for a specific course.
Calendar View:
- In this view you can click and drag an item to assign it to a different day. You can also add items to each day by clicking in the blank space of the date.
List View
- In this view, click the “Edit” button to make changes to the Assignment/Event, or click the “Delete” button to eliminate that Assignment/Event.
How to Personalize the Planner
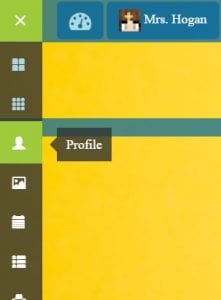
Your planner can be personalized with a new background, music, and more. To begin, click the three lines in the upper left corner, then select Profile.
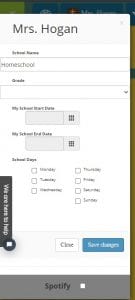
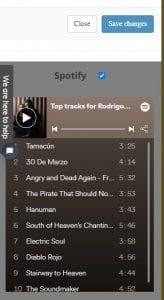
You will now see a form to complete to set your school name, year, and grade level. You can also opt to turn on our curated Spotify playlist of instrumental music focused listening.
Below the Profile icon, you will see an image icon. Here you can choose a different background image for your planner from our selection. Each user may select their own image.
How to View Report Cards
While in your student’s HHP dashboard, click Report Card. This will show you a report of the Quiz, Assignments, and Final grade for each course. For a full breakdown of each course grade, please go to the actual Course page while logged into your student’s SKrafty account.
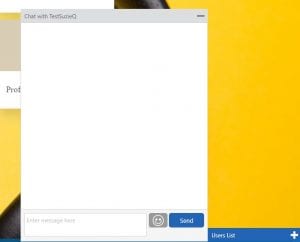
How to Use Student Chat
In the lower right hand corner of the HHP, you will see a white box that says “Chat with” and beside that you will find “User List”. You can view your students that are actively utilizing the HHP in the user list. These students will be available to chat with. To do so, select the student you wish to chat with using the student name button in the upper left of the screen. Then, you will click the + sign to open the chat window. Type your message to the student and click send.